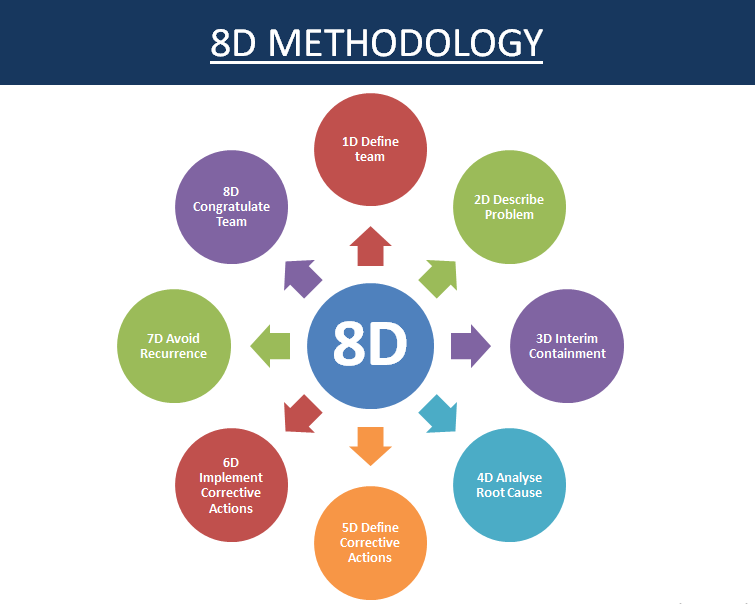
What’s 8D Methodology?
- 8D Methodologyis a methodical problem- solving tools or you can say it’s a strategy.
- It wasmade popular by “ Ford Motor Company” in the automotive industry. And now it has been widely used by many organisation across the globe
- These are 8 disciplinesor 8 steps thatJust be followed for identifying and barring a problem in a product, process, or service.
Eight steps of Problem Solving
- Establishthe team
- Describethe problem
- Developinterim containment actions
- Defineand validate root cause & escape points
- Chooseand validate endless corrective actions
- Implementand validate endless corrective actions
- Systemprevention actions to help a recurrence
- Feteteam contributions

8D Problem Solving Illustration
Step 1 Establish the Team
- Purpose
- Establish a small group of people with applicable knowledge.
- Key activities of the team in step 1
- Review priorities, scope, and problem
- Identify how big team is demanded
- Identify team members and establish the team
- Nominate a team leader, project champion and facilitator Assign the places and liabilities
Step 2 Describe the Problem
Purpose of STEP 2
- Describe the internal or external issue by relating “ what is wrong with what” and detailing the problem in quantifiable terms so it’s easy to take more action.
Key exercise in STEP 2
- Develop a problem statement and a flowchart of all operation steps and identify critical operation steps with respect to the problem.
- Establish a high-level project plan, including milestones, project goals, and objects.
- The description should define the boundaries.
We can use the below tools to describe the problem.
- 5W2H strategy
- Why-Why Analysis
- Check Sheet
STEP 3 Develop Interim Containment Actions
Purpose of STEP 3
- Define, validate and apply interim containment action to insulate the effects of the problem from any internal and/ or external client until permanent corrective (preventative) conduct is enforced.
Key activities in STEP 3
- Define the interim containment action
- Verify the effectiveness of the interim containment action
- Select and apply interim constraint action
- Validate the effectiveness of implemented interim containment action with the client
The containment actions must be enforced at the below position
- Client’s finished good (FG) warehouse
- At the client’s line
- Client’s RM warehouse
- Supplier’s FG warehouse
- At the Supplier’s line
- Supplier’s RM warehouse
- Also, check at sub supplier’s sequence of operation
We can use the below tools for developing interim containment actions
- Why-Why Analysis
- Check Sheet
- Process Flow Diagram
STEP 4 Define and validate Root Cause & Escape Points
Purpose of STEP 4
- In this stage, the root cause is linked to take permanent action to exclude the problem.
Key exercise in STEP 4
- Development and verification of root cause through data collection
- Review process flow for the place of the root cause
- Determine the escape point
- The escape point is the closest point in the process where the root cause could have been plant but was not.
We can use the below tools for define & validate the root cause & escape points
- Fishbone or Ishikawa illustration
- Why-Why Analysis
- Check Sheet
- scattering Diagram
- Process Flow Chart
STEP 5 Choose and Verify Endless Corrective Actions
Purpose of STEP 5
- Select the best permanent corrective conduct to eliminate the root cause in the process.
Key conditioning in STEP 5
- Develop and select the result to remove the root cause & escape point
- validate that effectiveness of the selected results
Six Mistake-Proofing Principles
- Elimination
- Prevention
- Replacement
- Facilitation
- Detection
- Mitigation

SeveralMistake-Proofing techniques
- Variation Control
- Workplace Organization
- Identification ⇢Process Checks
- Poka-Yoke Devices
VariousMistake-Proofing Devices
- Guide Pins
- Error Detection & Alarms
- Limit Switches
- Sensors
- Vision Systems
- Counters& Timers
- Checklists
We can usebelow tools for Choose and validate Permanent Corrective Actions
- Fishbone or Ishikawa illustration
- Why-Why Analysis
- CheckSheet
- scatteringDiagram
- ProcessFlow Chart
- PFMEA ( ProcessFailure Mode and Effect Analysis)
- ControlPlan
STEP 6 Implement and Validate Permanent Corrective Actions
Purposeof STEP 6
- Planand implement selected Permanent Corrective Actions
Key activitiesin STEP 6
- Implementthe best result to remove the root cause & escape point
- Validatethe effectiveness of the implemented action.
- Monitorthe effectiveness of the enforced results and assure that they don’t cause any undesirable effects.
- Communicatethe plan to all applicable interested parties.
We can usebelow tools for apply and validate endless corrective actions
- Causeand Effect Diagram or Fishbone
- Why-Why Analysis
- CheckSheet
- scatteringDiagram
- ProcessFlow Diagram
STEP 7 System Prevention Action to Prevent Recurrence
Purposeof STEP 7
- The purposeof the prevent recurrence is to partake the knowledge, preventing problems on similar products, processes, places or families.
Key exercisein STEP 7
- Reviewsimilar products and processes for problem prevention (Horizontal Deployment)
- To updateprocedures and work instructions
- AssurePFD, PFMEA and Control Plan have been updated
- Checkthe demanding standardization has been identified and implemented?
We can usebelow tools/ documents to prevent rush
- Cause& Effect Diagram or Fishbone
- Why-Why Analysis
- CheckSheet
- scatteringDiagram
- PFD ( ProcessFlow Diagram)
- PFMEA ( ProcessFailure Mode and Effect Analysis)
- ControlPlan
- WorkInstruction/ Bribe and Procedure
STEP 8 Recognize Team Contributions
Purposeof STEP 8
- Identifythe lesson (s) learned and celebrating the success of the team.
Key exercisein STEP 8
- Performa final review of the problem- solving project
- Preparethe report for future reference
- Documentthe lesson learned
- Before and after comparison of issue
- Recognizethe team’s success and individual contributions
We can usebelow reports for the final stage in the 8D Methodology
- 8D Report
- LessonLearned Report
- Before and After Comparison of issue
 Greendot Management Solutions
- SMART Goal Setting in Six SigmaSMART Goal Setting in Six Sigma A SMART goal is an acronym that stands for Specific, Measurable, Achievable, Realistic, and Time-bound. Thus, SMART goals integrate all of these criteria to help us increase the possibilities of achieving your goal. The project’s goals and objectives can be defined base on the project scope and problem statement. Goal Statement defines the expected improvement […]
- 12 Step of TPM Implementation12 Step of TPM Implementation| How to Implement TPM? Few Things we will cover in this post of 12 steps of TPM implementation How to Apply TPM (Total Productive Maintenance)? Preface of TPM 8 Pillars of Total Productive Maintenance Benefits of TPM (Total Productive Maintenance) 12 steps of TPM Implementation Also watch TPM Video:- https://www.youtube.com/watch?v=M-YccQYqRr4&t=22s […]
- Muda Mura MuriWhat’s Muda Mura Muri in Lean Manufacturing? The 3M methodology in Lean Manufacturing is basically used in the Toyota Production System. The 3M stands for Muda, Mura, and Muri. This is a Japanese Concept. The goal of Lean Manufacturing is to deliver increased value to the client with the help of barring all kinds of wastes from […]
- 7 Types of Abnormalities in TPM7 Types of Abnormalities in TPM Anything which isn’t normal that’s called an abnormality Fuguai is a Japanese word. Fuguai means abnormality. We can also say that the abnormality is a deviation from the standard requirement. The abnormality is a very much popular concept in Total Productive Maintenance (TPM). Several types of abnormalities are the part of Jishu Hozen Pillar in TPM Abnormality classify Matrix is also prepared in JH […]
- 8 Wastes of Lean ManufacturingWhat are the 8 Wastes of Lean? 8 Wastes of Lean are identified as Transportation, Inventory, Motion, Waiting, Overproduction, Over-processing, Defects, & Skillset or Non-utilized talent. Earlier it was considered as 7 waste of lean manufacturing too. We will cover the following topics in this blog The acronym we can say is TIMWOODS or DOWNTIME. What’s Waste in Process or Lean Manufacturing? […]
- Cost of Quality vs Cost of Poor Quality (COPQ)What’s the Cost of Poor Quality (COPQ)? It’s the cost related to providing poor quality products or services. In easy words, we can say that it’s the total financial losses incurred by the company due to doing the wrong things. COPQ is the cost that would disappear if in smooth operating conditions. It’s a refinement of the conception of COQ. […]
- What is Lean Six Sigma ?What’s Lean Six Sigma? Sigma (𝝈) is the Greek letter representing a statistical unit of measure that defines the standard deviation (SD) of a population. Six refers to the number of SD’s from the technical limit to the mean. It measures the variability or spread of the data. 6 sigma is a largely structured strategy. […]
- Six Big Losses in OEESix Big Losses in OEE and TPM The Six Big Losses are responsible for productivity. We’ve to exclude these to ameliorate productivity. One of the major goals of TPM ( Total Productive Maintenance) and OEE (Overall Equipment Effectiveness) is to reduce and eliminate Six Big Losses. Also refer to: https://www.youtube.com/watch?v=6ubu3vO1LDs&t=70s OR https://www.youtube.com/watch?v=M-YccQYqRr4 We will cover the following topics in this blog Classification of Big Losses Classification of Six Big Losses in […]
- Top Lean ToolsTop lean Manufacturing – Lean Operation Tools Top lean Tools are the methodical and scientific approaches for problem- working. Spare Tools are also used for relating and barring waste from the system or process. These tools are veritably important to apply Lean Manufacturing culture in the plant. Watch video on lean manufacturing crash Course just […]
- 5S in the Workplace | 5S ImplementationWhat’s 5S in the Work Place? 5S Methodology was developed in Japan and it’s a system for organizing spaces so work can be performed efficiently & effectively safely and it’s a fundamental tool of Lean Manufacturing It’s a system for organizing space so work can be performed efficiently & effectively with safely. Now and then it’s also […]